Spring JdbcTemplate基本使用、编程式事务控制相关对象、基于XML与注解的声明式事务控制。
Spring JdbcTemplate基本使用 一、JdbcTemplate概述 它是Spring框架中提供的一个对象,是对原始繁琐的 Jdbc API对象的简单封装。spring框架为我们提供了很多操作模板类。例如:操作关系型数据库的Jdbc Template和Hibernate Template ,操作nosql数据库的Redis Template,操作消息队列的Jms Template等等。
二、JdbcTemplate开发步骤 1、导入spring-jdbc和spring-tx坐标;
2、创建数据库表和实体;
3、创建JdbcTemplate对象;
4、执行数据库操作。
三、Spring产生模板对象 我们可以使用JdbcTemplate的创建权交给Spring,将数据源DataSource的创建权也交给Spring(注入依赖)。
1
2
3
4
5
6
7
8
9
10
11
12
13
14
15
16
17
18
19
20
21
22
23
24
25
26
27
28
29
30
31
32
33
34
<?xml version="1.0" encoding="UTF-8" ?> <beans xmlns ="http://www.springframework.org/schema/beans" xmlns:xsi ="http://www.w3.org/2001/XMLSchema-instance" xmlns:context ="http://www.springframework.org/schema/context" xsi:schemaLocation =" http://www.springframework.org/schema/beans http://www.springframework.org/schema/beans/spring-beans.xsd http://www.springframework.org/schema/context http://www.springframework.org/schema/context/spring-context.xsd " > <context:property-placeholder location ="classpath:jdbc.properties" /> <bean id ="dataSource" class ="com.mchange.v2.c3p0.ComboPooledDataSource" > <property name ="driverClass" value ="${jdbc.driver}" /> <property name ="jdbcUrl" value ="${jdbc.url}" /> <property name ="user" value ="${jdbc.username}" /> <property name ="password" value ="${jdbc.password}" /> </bean > <bean id ="template" class ="org.springframework.jdbc.core.JdbcTemplate" > <property name ="dataSource" ref ="dataSource" /> </bean > </beans >
四、CRUD操作
五、知识要点 1、导入spring-jdbc和spring-tx坐标;
2、创建数据库表和实体;
3、创建JdbcTemplate对象
1
2
JdbcTemplate template = new JdbcTemplate ();template.setDataSource(dataSource);
4、执行数据库操作
更新操作: template.update(sql,params)
查询操作: template.query(sql,Mapper,params)
template.queryForObject(sql,Mapper,params)
编程式事务控制相关控制对象 PlatformTransactionManger接口是Spring的事务管理器,它里面提供了我们常用的操作事务的方法
方法
说明
TransactionStatus getTransaction(TransactionDefination defination)
获取事务的状态信息
void commit(TransactionStatus status)
提交事务
void rollback(TransactionStatus status)
回滚事务
注意事项: PlatformTransactionManger是接口类型,不同的Dao层技术则有不同的实现类。
例如: Dao层技术是jdbc或mybatis时:org.springframework.jdbc.datasource.DataSourceTransactionManager
Dao 层技术是hibernate时:org.springframework.orm.hibernate5,HibernateTransactionManager
二、TransactionDefinition TransactionDefinition是事务的定义信息对象,里面有如下方法:
方法
说明
int getIsolationLevel()
获得事务的隔离级别
int getPropogationBehavior()
获得事务的传播行为
int getTimeout()
获得超时时间
boolean isReadOnly
是否只读
1、事务隔离级别 设置隔离级别,可以解决事务并发产生的问题,如脏读、不可重复读和而虚读(幻读)
ISOLATION_DEFAULT:默认
ISOLATION_READ_UNCOMMITTED:读未提交
ISOLATION_READ_COMMITTED:读已提交(解决脏读问题)
ISOLATION_REPEATABLE_READ:可重复读(解决不可重复读)
ISOLATION_SERIALIZABLE:串行化(可以解决全部问题)
2、事务的传播行为 事务传播行为的主要作用是为了解决业务方法在调用业务方法时的统一性。
REQUIRED: 如果当前没有事务,就新建一个事务,如果当前已经存在一个事务中,加入到当前这个事务中,一般的选择(默认值)。SUPPORTS: 支持当前事务,如果当前没有事务,就以非事务方式执行(没有事务)。MANDATORY: 使用当前的事务,如果当前没有事务就抛出异常。REQUERS_NEW: 新建事务,如果当前在事务中,把当前事务挂起。NOT_SUPPORTED: 以事务方式执行操作,如果当前存在事务,就把当前事务挂起。NEVER: 以非事务方式运行,如果当前存在事务,抛出异常。NESTED: 如果当前存在事务,则在嵌套事务内执行。如果当前没有事务,则执行REQUIRED类似的操作。超时时间: 默认值时-1,没有超时限制。如果有,以秒为单位进行设置。是否只读: 建议查询时设置为只读。
三、TransactionStatus TransactionStatus接口提供的是事务具体的运行状态,方法介绍如下。
方法
说明
boolean hasSavepoint()
是否存储回滚点
boolean isCompleted()
事务是否完成
boolean isNewTransaction()
是否是新事务
boolean isRollbackOnly()
事务是否回滚
TransactionDefinition + PlatformTransactionManger = TransactionStatus
四、知识要点 编程事务控制三大对象:
PlatformTransactionManger : 平台参数TransactionDefinition : 隔离级别TransactionStatus: 运行状态
基于XML的声明式事务控制 一、什么是声明式事务控制 Spring的声明式事务顾名思义就是采用声明的方式来处理事务。这里所说的声明,就是指在配置文件中声明,用在Spring配置文件中声明式的处理事务来代替代码式的处理事务。
声明式事务处理的作用:
事务管理不侵入开发的组件。具体来说,业务逻辑对象就不会意识到正在事务管理中,事实上也应该如此,因为事务管理是属于系统层面的服务,而不是业务逻辑的一部分,如果想要改变事务管理策划的话,也只需要在定义文件中重新配置即可。
在不需要事务管理的时候,只要在设定文件上修改一下,即可移去事务管理服务,无需改变代码重新编译,这样维护起来及其方便。
注意事项: Spring声明式事务控制底层就是AOP。
二、代码演示 1、环境配置 (1)创建数据库表
(2)配置坐标
1 2 3 4 5 6 7 8 9 10 11 12 13 14 15 16 17 18 19 20 21 22 23 24 25 26 27 28 29 30 31 32 33 34 35 36 37 38 39 40 41 42 43 44 45 46 47 48 49 50 51 52 53 54 <dependencies > <dependency > <groupId > mysql</groupId > <artifactId > mysql-connector-java</artifactId > <version > 5.1.32</version > </dependency > <dependency > <groupId > c3p0</groupId > <artifactId > c3p0</artifactId > <version > 0.9.1.2</version > </dependency > <dependency > <groupId > com.alibaba</groupId > <artifactId > druid</artifactId > <version > 1.1.10</version > </dependency > <dependency > <groupId > junit</groupId > <artifactId > junit</artifactId > <version > 4.12</version > </dependency > <dependency > <groupId > org.springframework</groupId > <artifactId > spring-test</artifactId > <version > 5.2.7.RELEASE</version > </dependency > <dependency > <groupId > org.springframework</groupId > <artifactId > spring-context</artifactId > <version > 5.2.7.RELEASE</version > </dependency > <dependency > <groupId > org.springframework</groupId > <artifactId > spring-jdbc</artifactId > <version > 5.0.3.RELEASE</version > </dependency > <dependency > <groupId > org.springframework</groupId > <artifactId > spring-tx</artifactId > <version > 5.2.7.RELEASE</version > </dependency > <dependency > <groupId > org.aspectj</groupId > <artifactId > aspectjweaver</artifactId > <version > 1.8.13</version > <scope > test</scope > </dependency > <dependency > <groupId > org.aspectj</groupId > <artifactId > aspectjweaver</artifactId > <version > 1.8.13</version > <scope > compile</scope > </dependency > </dependencies >
2、创建数据库表的实体类 1 2 3 4 5 6 7 8 9 10 11 12 13 14 15 16 17 18 19 20 21 22 23 24 25 26 27 28 29 30 package cn.domain;public class Account { private String name; private Double money; public String getName () { return name; } public void setName (String name) { this .name = name; } public Double getMoney () { return money; } public void setMoney (Double money) { this .money = money; } @Override public String toString () { return "Account{" + "name='" + name + '\'' + ", money=" + money + '}' ; } }
3、编写Spring的配置文件 1 2 3 4 5 6 7 8 9 10 11 12 13 14 15 16 17 18 19 20 21 22 23 24 25 26 27 28 29 30 31 32 <?xml version="1.0" encoding="UTF-8" ?> <beans xmlns ="http://www.springframework.org/schema/beans" xmlns:xsi ="http://www.w3.org/2001/XMLSchema-instance" xmlns:context ="http://www.springframework.org/schema/context" xmlns:aop ="http://www.springframework.org/schema/aop" xmlns:tx ="http://www.springframework.org/schema/tx" xsi:schemaLocation =" http://www.springframework.org/schema/beans http://www.springframework.org/schema/beans/spring-beans.xsd http://www.springframework.org/schema/context http://www.springframework.org/schema/context/spring-context.xsd http://www.springframework.org/schema/aop http://www.springframework.org/schema/aop/spring-aop.xsd http://www.springframework.org/schema/tx http://www.springframework.org/schema/tx/spring-tx.xsd " > <context:property-placeholder location ="jdbc.properties" /> <bean id ="dataSource" class ="com.mchange.v2.c3p0.ComboPooledDataSource" > <property name ="driverClass" value ="${jdbc.driver}" /> <property name ="jdbcUrl" value ="${jdbc.url}" /> <property name ="user" value ="${jdbc.username}" /> <property name ="password" value ="${jdbc.password}" /> </bean > <bean id ="template" class ="org.springframework.jdbc.core.JdbcTemplate" > <property name ="dataSource" ref ="dataSource" /> </bean > <context:component-scan base-package ="cn" /> </beans >
4、编写Dao层(持久层) 1 2 3 4 5 6 7 8 9 10 11 12 13 14 15 16 17 18 19 20 21 22 23 24 25 26 27 28 29 30 @Repository("accountDao") public class AccountDaoImpl implements AccountDao { @Autowired private JdbcTemplate template; public int insertAccount (Account account) { String sql = "insert into account(name,money) values(?,?) " ; return template.update(sql,account.getName(),account.getMoney()); } public int deleteAccpunt (String name) { String sql = "delete from account where name = ?" ; return template.update(sql,name); } public int updateAccount (Account account) { String sql = "update account set money = ? where name = ?" ; return template.update(sql,account.getMoney(),account.getName()); } public Account selectByName (String name) { String sql = "select * from account where name = ?" ; return template.queryForObject(sql,new BeanPropertyRowMapper <Account>(Account.class),name); } public List<Account> selectAll () { String sql = "select * from account" ; return template.query(sql,new BeanPropertyRowMapper <Account>(Account.class)); } }
5、编写Service层 1 2 3 4 5 6 7 8 9 10 11 12 13 14 15 16 17 18 19 20 21 22 23 24 25 26 27 @Service public class AccountServiceImpl implements AccountService { @Autowired private AccountDao accountDao; public int zhuanzhang (String name1, String name2, Double money) { Account account1 = accountDao.selectByName(name1); Account account2 = accountDao.selectByName(name2); Double money1 = account1.getMoney(); Double money2 = account2.getMoney(); account1.setMoney(money1 - money); account2.setMoney(money2 + money); int i1 = accountDao.updateAccount(account1); int i = 1 / 0 ; int i2 = accountDao.updateAccount(account2); return i1 + i2; } }
6、编写测试类 1 2 3 4 5 6 7 8 9 10 11 12 @RunWith(SpringJUnit4ClassRunner.class) @ContextConfiguration("classpath:applicationContext.xml") public class ServiceTest { @Autowired private AccountService accountService; @Test public void zhuanzhang () { int zhuanzhang = accountService.zhuan("zhangsan" , "tom" , 500.0 ); System.out.println(zhuanzhang); } }
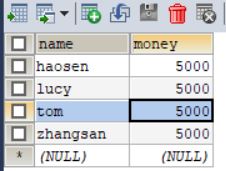
此时没有使用xml配置事务控制运行之后的数据库结果为:
可以发现用户“zhangsan”向用户“tom”转账500元,但zhangsan转账之后,张三的账户确实少了500元,但tom的账户并没有多出500元。以致于zhangsan的500元凭空消失了。
此时修改xml配置文件如下(加入事务控制):
1 2 3 4 5 6 7 8 9 10 11 12 13 14 15 16 17 18 19 20 21 22 23 24 25 26 27 28 29 30 31 32 33 34 35 36 37 38 39 40 41 42 43 44 45 46 47 48 49 50 51 <?xml version="1.0" encoding="UTF-8" ?> <beans xmlns ="http://www.springframework.org/schema/beans" xmlns:xsi ="http://www.w3.org/2001/XMLSchema-instance" xmlns:context ="http://www.springframework.org/schema/context" xmlns:aop ="http://www.springframework.org/schema/aop" xmlns:tx ="http://www.springframework.org/schema/tx" xsi:schemaLocation =" http://www.springframework.org/schema/beans http://www.springframework.org/schema/beans/spring-beans.xsd http://www.springframework.org/schema/context http://www.springframework.org/schema/context/spring-context.xsd http://www.springframework.org/schema/aop http://www.springframework.org/schema/aop/spring-aop.xsd http://www.springframework.org/schema/tx http://www.springframework.org/schema/tx/spring-tx.xsd " > <context:property-placeholder location ="jdbc.properties" /> <bean id ="dataSource" class ="com.mchange.v2.c3p0.ComboPooledDataSource" > <property name ="driverClass" value ="${jdbc.driver}" /> <property name ="jdbcUrl" value ="${jdbc.url}" /> <property name ="user" value ="${jdbc.username}" /> <property name ="password" value ="${jdbc.password}" /> </bean > <bean id ="template" class ="org.springframework.jdbc.core.JdbcTemplate" > <property name ="dataSource" ref ="dataSource" /> </bean > <bean id ="transactionManager" class ="org.springframework.jdbc.datasource.DataSourceTransactionManager" > <property name ="dataSource" ref ="dataSource" /> </bean > <tx:advice id ="txAdvice" transaction-manager ="transactionManager" > <tx:attributes > <tx:method name ="*" /> </tx:attributes > </tx:advice > <aop:config > <aop:advisor advice-ref ="txAdvice" pointcut ="execution(* cn.Service.Impl.AccountServiceImpl.zhuanzhang(..))" /> </aop:config > <context:component-scan base-package ="cn" /> </beans >
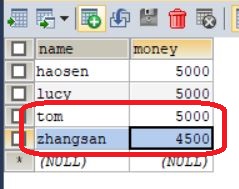
此时再次将双方账户急呢回复后运行结果依然报错,但此时再查看数据库的数据为:
由于发生了错误,所以事务回滚了。
三、事务控制知识要点 1、声明事务控制的配置要点 (1)平台事务管理器配置;
1 2 3 4 <bean id ="transactionManager" class ="org.springframework.jdbc.datasource.DataSourceTransactionManager" > <property name ="dataSource" ref ="dataSource" /> </bean >
(2)事务通知的配置;
1 2 3 4 5 6 7 <tx:advice id ="txAdvice" transaction-manager ="transactionManager" > <tx:attributes > <tx:method name ="*" /> </tx:attributes > </tx:advice >
<tx:method>标签的属性:
属性名称
说明
默认值
name
方法的名称
\
isolation
隔离级别
DEFAULT
propagetion
传播行为
REQUIRED
timeout
最长等待时长
-1
read-only
是否只读
false
(3)事务AOP织入的配置。
1 2 3 4 <aop:config > <aop:advisor advice-ref ="txAdvice" pointcut ="execution(* cn.Service.Impl.AccountServiceImpl.zhuanzhang(..))" /> </aop:config >
基于注解的声明式事务控制 一、事务注解配置代码演示 1、配置xml配置文件 1 2 3 4 5 6 7 8 9 10 11 12 13 14 15 16 17 18 19 20 21 22 23 24 25 26 27 28 29 30 31 32 33 34 35 36 37 38 39 40 41 <?xml version="1.0" encoding="UTF-8" ?> <beans xmlns ="http://www.springframework.org/schema/beans" xmlns:xsi ="http://www.w3.org/2001/XMLSchema-instance" xmlns:context ="http://www.springframework.org/schema/context" xmlns:aop ="http://www.springframework.org/schema/aop" xmlns:tx ="http://www.springframework.org/schema/tx" xsi:schemaLocation =" http://www.springframework.org/schema/beans http://www.springframework.org/schema/beans/spring-beans.xsd http://www.springframework.org/schema/context http://www.springframework.org/schema/context/spring-context.xsd http://www.springframework.org/schema/aop http://www.springframework.org/schema/aop/spring-aop.xsd http://www.springframework.org/schema/tx http://www.springframework.org/schema/tx/spring-tx.xsd " > <context:property-placeholder location ="jdbc.properties" /> <bean id ="dataSource" class ="com.mchange.v2.c3p0.ComboPooledDataSource" > <property name ="driverClass" value ="${jdbc.driver}" /> <property name ="jdbcUrl" value ="${jdbc.url}" /> <property name ="user" value ="${jdbc.username}" /> <property name ="password" value ="${jdbc.password}" /> </bean > <bean id ="template" class ="org.springframework.jdbc.core.JdbcTemplate" > <property name ="dataSource" ref ="dataSource" /> </bean > <bean id ="transactionManager" class ="org.springframework.jdbc.datasource.DataSourceTransactionManager" > <property name ="dataSource" ref ="dataSource" /> </bean > <context:component-scan base-package ="cn" /> <tx:annotation-driven transaction-manager ="transactionManager" /> </beans >
2、配置Service层 1 2 3 4 5 6 7 8 9 10 11 12 13 14 15 16 17 18 19 20 21 22 23 24 25 26 27 28 29 30 31 32 33 34 35 36 37 38 39 40 41 42 package cn.Service.Impl;import cn.Service.AccountService;import cn.dao.AccountDao;import cn.domain.Account;import org.springframework.beans.factory.annotation.Autowired;import org.springframework.stereotype.Service;import org.springframework.transaction.annotation.Isolation;import org.springframework.transaction.annotation.Propagation;import org.springframework.transaction.annotation.Transactional;import java.util.List;@Service @Transactional public class AccountServiceImpl implements AccountService { @Autowired private AccountDao accountDao; @Transactional(isolation = Isolation.READ_COMMITTED,propagation = Propagation.REQUIRED) public int zhuan (String name1, String name2, Double money) { Account account1 = accountDao.selectByName(name1); Account account2 = accountDao.selectByName(name2); Double money1 = account1.getMoney(); Double money2 = account2.getMoney(); account1.setMoney(money1 - money); account2.setMoney(money2 + money); int i1 = accountDao.updateAccount(account1); int i2 = accountDao.updateAccount(account2); return i1 + i2; } }
注意事项: 当类和方法都添加了@Transactional时,采用就近原则。使用方法上面的注解配置。
二、知识点 1、注解配置声明式事务控制解析 (1)使用@Transaction在需要进行事务控制的类或是方法上修饰,注解可用的属性同xml配置方式,例如:隔离级别、传播行为等。
(2)注解使用在类上,那么该类下的所有方法都是用同一套注解参数配置。
(3)使用在方法上,不同的方法可以采用不同的事务参数配置。
(4)Xml配置文件中要开启事务的注解驱动<tx:annotation-driven transaction-manager=”transactionManager”/>
2、注解配置事务控制要点 (1)平台事务管理器配置(xml方式)
(2)事务通知配置(@Transaction注解配置)
(3)事务注解驱动的配置<tx:annotation-driven transaction-manager=”transactionManager”/>
参考资料:2020年 最新版 传智黑马Java SSM 阶段 采用IDEA教学